Take a Backup of an NAE using SCT when you don’t have a backup file.
In this blog I will show you the classical way to take an NAE database backup when you don’t have any prior backups files. Basically, I will show how to do it from scratch using the System Configuration Tool (SCT). For this example, we are assuming that you have a Metasys ADS Server and at least one supervisory device (e.g. an NAE). Also, I am assuming that you have access to the live Metasys system, the Site Management Portal (SMP), and have access to SCT.
Note: This blog shows images from Metasys SCT 14.2 and Metasys SMP version 11.0.
STEP 1 – OPEN THE JOHNSON CONTROLS LAUNCHER
Let’s start by opening your Launcher. Once opened, click on the SCT tab, select your localhost, and click Launch. This will launch SCT. If your computer doesn’t have SCT installed, you will not see the SCT tab in the launcher and you will not be able to take any database backups.

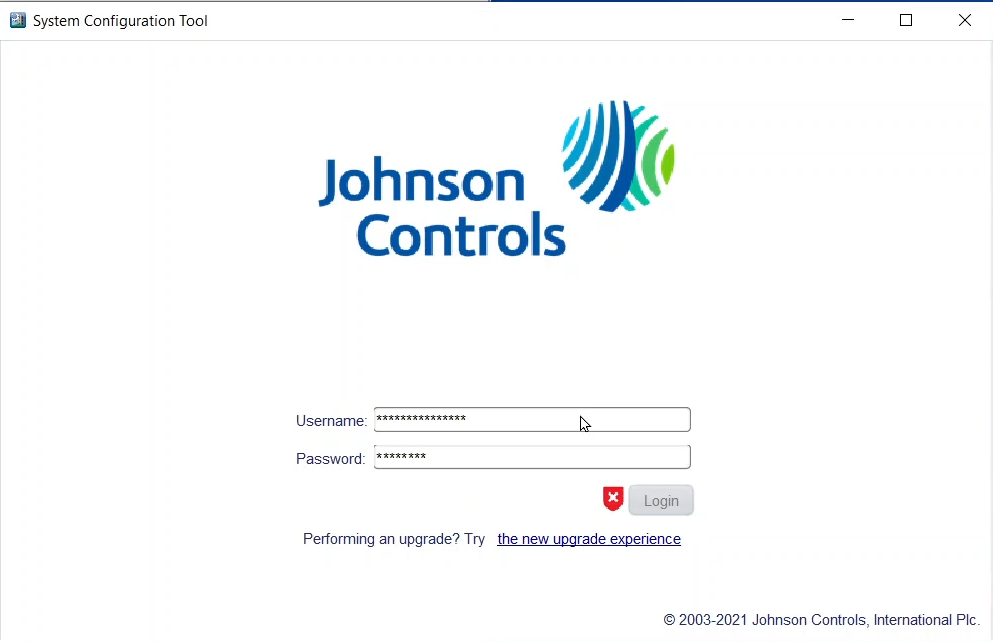
STEP 2 – LOGIN TO SCT
Once you launched, type your SCT credentials to login to SCT. Do not type the credentials you use to login to the NAE or the Metasys server (e.g. ADS), unless they are the same. SCT has its own credentials.
Once you launched, type your SCT credentials to login to SCT. Do not type the credentials you use to login to the NAE or the Metasys server (e.g. ADS), unless they are the same. SCT has its own credentials.
STEP 3 – LAUNCH METASYS ADS SERVER
Right now, since you already have your Launcher open, it’s a good time to launch your SMP (your live Metasys site). We will need to get some information from the server and the NAE in the upcoming steps.
STEP 4 – CREATING A NEW ARCHIVE IN SCT
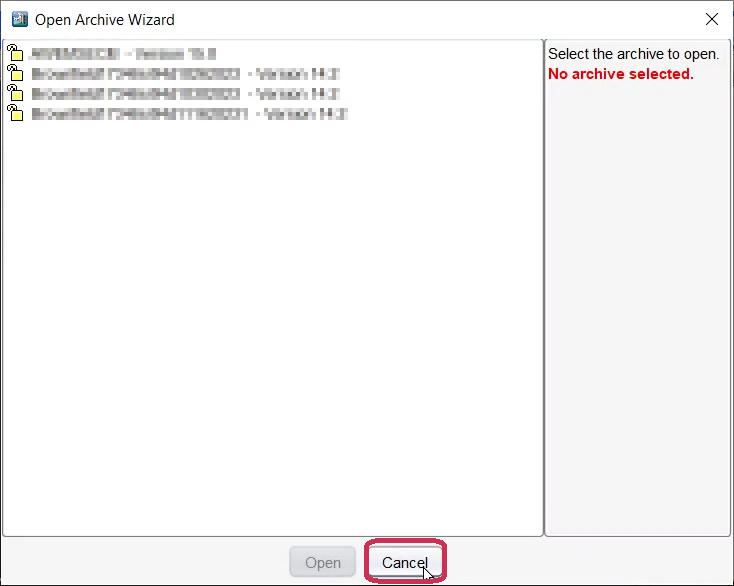
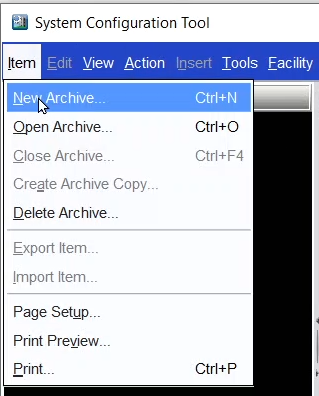
Going back to SCT go to Item > New Archive….
Enter a name for your database archive. I usually give the name of the Site, but it can be any name. Then select Empty Archive, as in this tutorial I am covering the classic way to create a backup in SCT, by manually entering the site, server, and engine information. A newer way is to scan for engines. Finally, click on Create.
Note: The archive name cannot start with a number.

STEP 5 – CREATE A SITE
5a – Create a Site
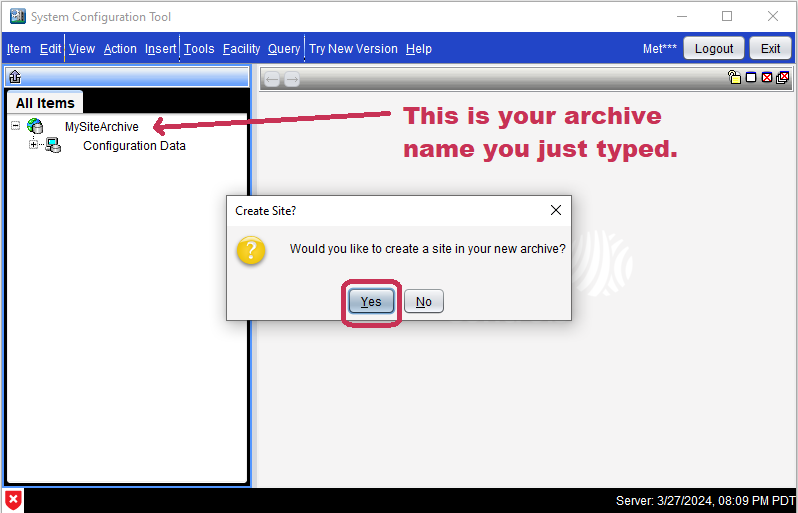
The wizard is going to ask you if you want to Create a Site. Click on Yes as you always need a site if you want to add a Metasys Server or a Supervisory Device (e.g. NAE, SNE) to your database archive.
5b – Create a Destination
Next step is to select the Destination of the Site. The only option available is to select your archive name (the icon with world and cylinder), then click Next.

5c – Site Name
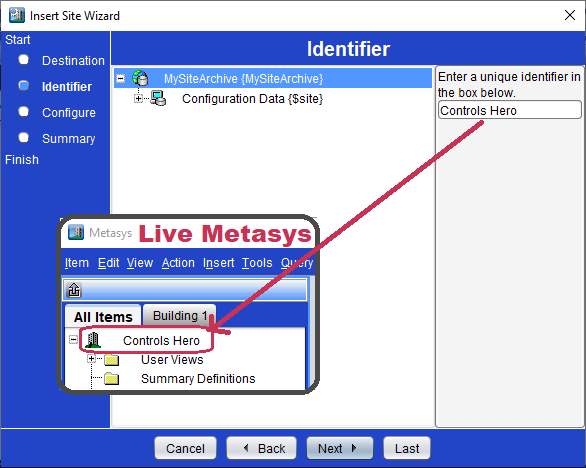
The next step is to give a name to your Site. Since we want to take a backup of an existing site, whether a backup of an entire Site, the Metasys server, or just a single NAE, we need to get the existing Site name. You can find the site name when you login to your live Metasys. It is the very top icon on your “All Items” tab. It has an icon of a building. Just simply take that exact name that you see next to the building icon and type it in under the “Enter a unique identifier in the box below.” box. See below:
5d – Site Configuration
Next step is the Site Configuration. I am almost positive that you don’t need to do anything in here. When you take the backup it will pull all of the information from the live site and fill it out for you. So just click Next.

5e – Site Summary
Click Finish to finish adding your site to the archive.

STEP 6 – ADDING THE SERVER
6a – Create Device?
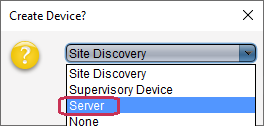
A new pop-up window should come out asking you to Create Device? Click on the dropdown menu, select Server, and click OK.
Note: We selected a Server since for this specific tutorial we are assuming a Metasys site that has both a Server and NAEs. If you only had a stand-alone NAE, you would have selected a Supervisory Device.
6b – Insert Server Wizard – Select Object Type
Next, see images below first to find the information required in this step.
Find Your Server Version
You can find your server version by going to live Metasys and clicking Help > About Metasys… > Version:.
Alternatively, just look at the Launcher and you can find your server version:

Find Your Server Type
Go to your live Metasys and double click on your server (the icon that has a computer with a gray cylinder). Under the Focus tab you should be able to find the server type.

Now Proceed With Step 6b
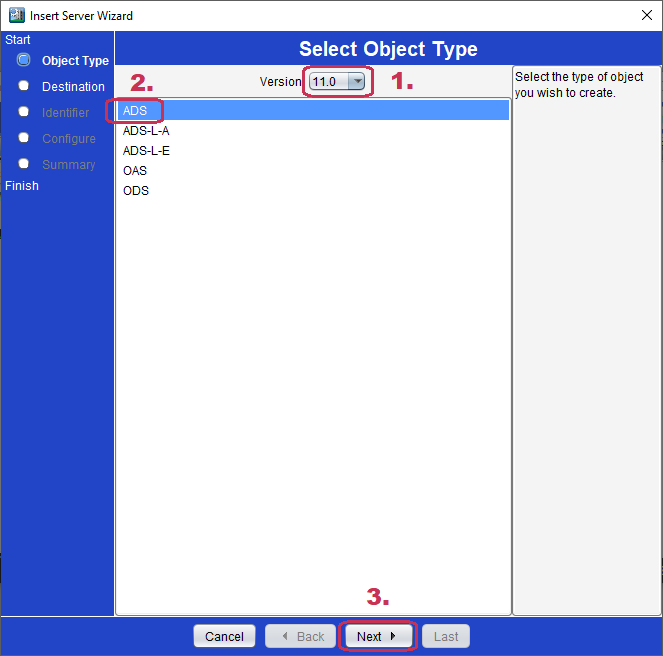
Select you Server version (in our case is 11.0), the server Object Type (in our case, and most typical is ADS), and click Next.
6c – Insert Server Wizard – Destination
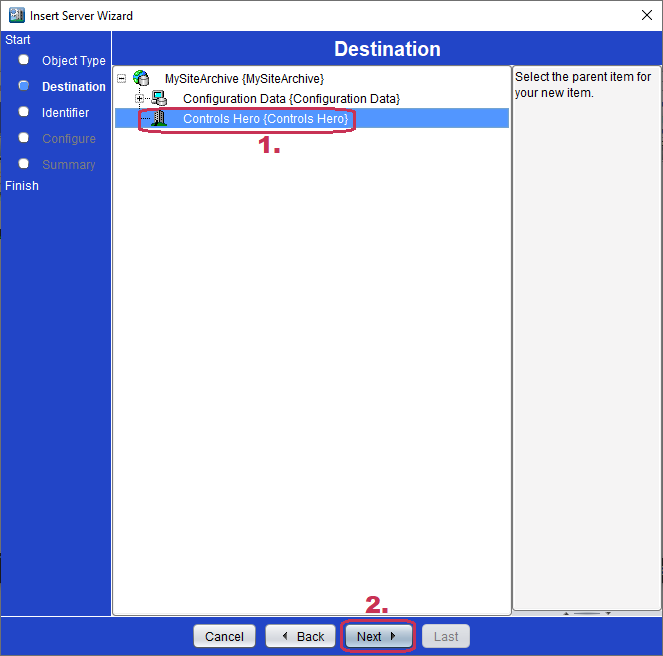
Next, select you newly created site (the building icon), and click Next.
6d – Insert Server Wizard – Identifier
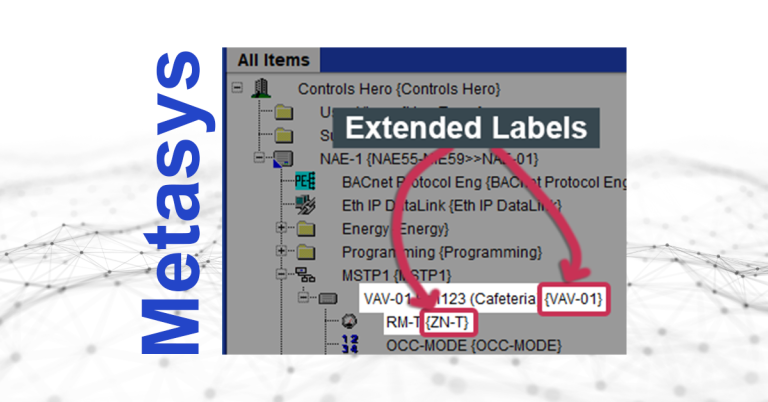
Now, this is a step where many people make a mistake. Here, you need too enter the server name (The Extended Label). You can find this name by going to the live Metasys and hovering over the server. When you do that, a yellow pop-up window will briefly appear. This will show you the server’s actual name. In my case is “HeroServer”, not “Controls Hero Server”.

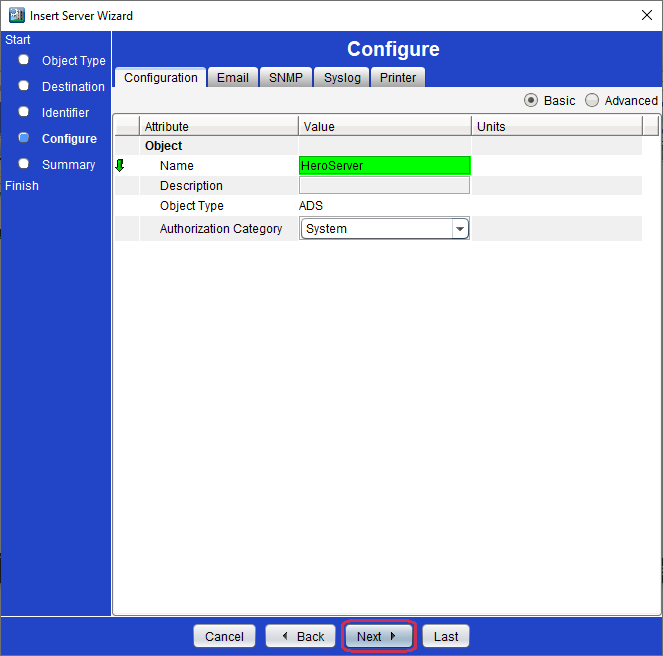
6e – Insert Server Wizard – Configure
Next is the Configure screen. Just go ahead and click Next. In this screen you could have changed the Object Name of the server but it’s not necessary since it will get it when we do the upload. In my case, my server’s Object name is “Controls Hero Server”.
Note: If you want lo learn about Extended Labels and Object Names, be sure to see my blog where I talk about them.
6f – Insert Server Wizard – Summary
Finally, click on Finish, to finish adding your server.

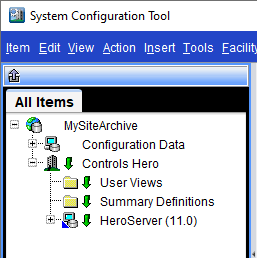
Now under your All Items in SCT, when you expand your Site (Controls Hero), you should see your Server (HeroServer) under the site.
STEP 7 – ADDING THE SUPERVISORY DEVICE (NAE)
Here I will just type all the steps you need to do to add your NAE. I still need to take screenshots and add them under each step.
Now that you have added your Site and Server, it’s time to add your first Supervisory Device, in our case, an NAE-55, third generation at Metasys Version 9.0.
7a – Insert a Supervisory Device
In SCT, select/highlight your Site, the building icon (in my case is Controls Hero). Go to Insert > Supervisory Device…

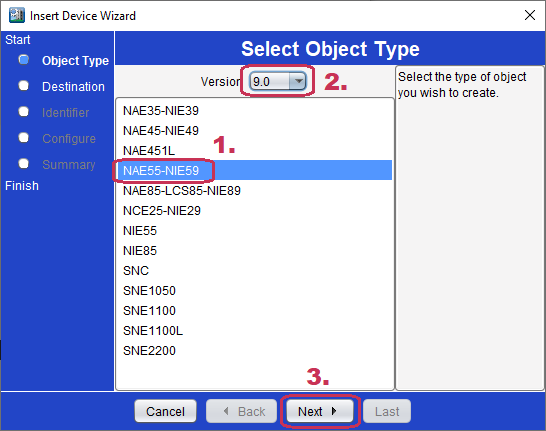
7b – Insert Device Wizard – Select Object Type
Select the correct NAE model that you want to add so you we can upload it. Also make sure to select the right NAE version (e.g. 9.0). Click Next.
Note: if you are not sure what NAE or what version you have see the step below.
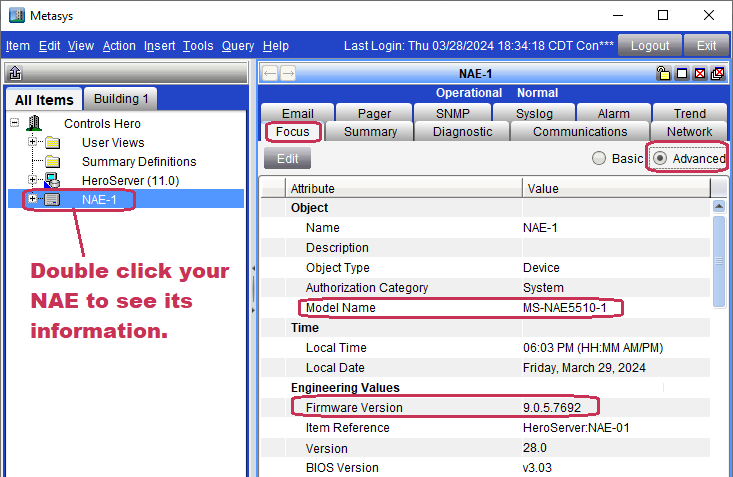
In order to find the NAE model, just double click your NAE in the live Metasys, and under the Focus tab, you should see the Model Name under Object. For example MS-NAE5510-1.
The NAE Version should be under the same Focus tab, but make sure to click on the Advanced radio button. It is under the Engineering Values > Firmware Version (e.g. 9.0.5.7692 is actually version 9.0).
Note: A Supervisory Device can be at the same version or lower version than the Server, but it cannot be at a higher revision. The Server is always the highest version.
7c – Insert Device Wizard – Destination
Under Destination, make sure your Site is selected (since you are adding your NAE under the site), and click Next.

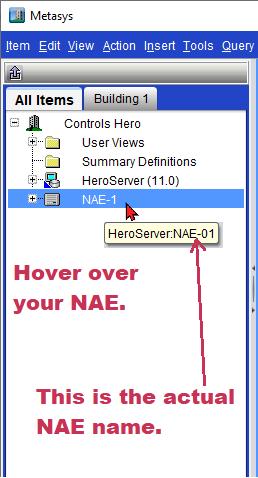
Next is a very important step, you need to enter the NAE’s name, it’s Extended Label, not its “display” or Object Name. This can be found the same was as your server’s name. In the live Metasys, just hover over your NAE and it will show you its actual name. For example, if you see HeroServer:NAE-01, then your NAE name is NAE-01. Click Next.

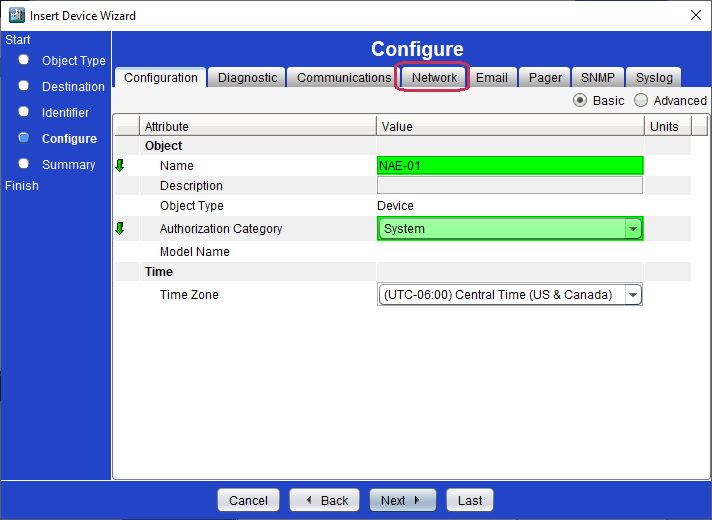
7d – Insert Device Wizard – Configure
Under the Configuration tab, leave it as is. When we do the upload, SCT will grab all this information from the live NAE. Click on the Network tab.
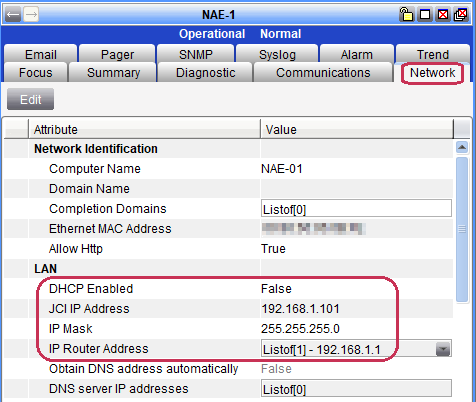
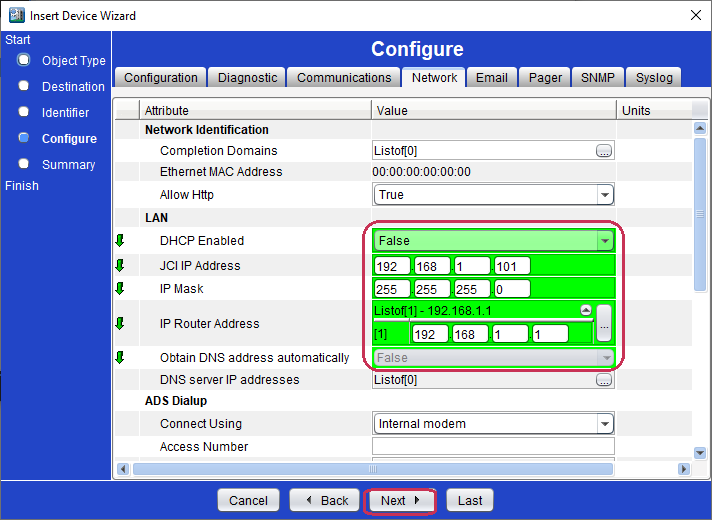
In the Network tab, make sure to set the NAE’s IP address settings correctly. Commonly, NAEs have a fixed IP address, meaning that the DHCP Enabled setting should be set to False. Go ahead and fill out the following settings:
- JCI IP Address.
- IP Mask.
- IP Router Address (this might be optional but I always add it).

You can find this information by double clicking on your live NAE, and going to its Network Tab.
Once done, click on Next, and then Finish.
STEP 8 – UPLOADING YOUR SERVER AND NAE
- In SCT, expand your Site, and select both your Server and NAE. You can do this by holding down the Ctrl key + clicking on each item.
- Go to Tools > Manage Archive…
- VERY IMPORTANTE: Make sure to select “Upload from Device”, since Upload means to Upload the data from the ADS/NAE to your computer/Archive.
- Make sure “Include Security” is checked.
- Click Next.
- A screen will show your server and NAE highlighted, if not please select what you want to upload, and click Next.
- Select “Upload Now” and click Next.
- Site Login: Check the “Communicate via Site Director” box and Type the Metasys Server credentials.
- Click Test Login, and if successful, click Next.
- Click Next until you see the Finish button. Once more, make sure to read “The following devices will be uploaded“. You don’t want to download!
- Click Finish to begin the Upload.
- You will see the progress in the “Actions in Progress” tab.
- Once finished, the “Completed Actions” tab will show an OK to the right of each device that you uploaded.
STEP 9 – TAKE A DATABASE BACKUP
- Once your uploads are completed, right click on the bar just above “All Items” tab and click on “Refresh Current Tab”. This will update the tree and you should be able to see all the items uploaded under the server and the NAE.
- Your last set is to take a backup of your database archive you just created and uploaded. To do so, go to Tools > Database > Create Backup.
- You can find you back in the following path:
- C:\ProgramData\Johnson Controls\MetasysIII\DatabaseFiles
You are finally done.